

Migrate SMB Data Securely: Kerberos and AWS DataSync Guide
Enter Kerberos: the authentication superhero that’s transforming how enterprises protect their data during cloud migrations. Unlike its predecessor, Kerberos doesn’t just authenticate—it creates a fortress of cryptographic security that makes traditional password-based methods look like a digital welcome mat.
Why Kerberos Matters in Modern Data Migration
Imagine Kerberos as a highly sophisticated digital bouncer, meticulously checking credentials without ever revealing sensitive information. It introduces mutual authentication, meaning both the client and server verify each other’s identity without transmitting passwords across potentially vulnerable networks.
For businesses leveraging AWS DataSync, Kerberos isn’t just an option—it’s becoming the gold standard of secure data transfer. By supporting Kerberos authentication for SMB locations, DataSync enables organizations to:
- Eliminate password transmission risks
- Implement stronger encryption
- Enhance overall network security
- Comply with stringent regulatory requirements
Key Kerberos Concepts: Demystified
Let’s break down some critical Kerberos terminology that might sound like cryptic tech jargon:
- Realm
- Think of this as your organization’s secure digital kingdom. In Active Directory, it’s typically your domain name in uppercase.
- Principal
- A unique identity—like a digital passport—that represents users or services within your realm.
- Keytab
- A cryptographic file containing secret keys, allowing programmatic access to authenticated resources.
The authentication dance is complex but elegant. Your DataSync agent communicates with the Key Distribution Center (KDC), obtaining tickets that grant access without ever exposing raw credentials.
Practical Implementation Tips
When configuring Kerberos with AWS DataSync, consider these pro strategies:
- Use AES 256-bit encryption as your default
- Maintain precise time synchronization between systems
- Securely manage and rotate keytab files
- Implement comprehensive DNS resolution
Pro Tip: Treat your keytab files like top-secret documents. They’re your keys to the kingdom and should be protected accordingly.
To allow a DataSync agent to request the Kerberos tickets needed to access your file share, you provide Kerberos configuration parameters when creating the DataSync SMB location.
Step 1: Use ktpass to assign a Service Principal Name to a user and export the keytab file
In this step you generate a keytab using the ktpass command from your Windows server to export the principal and the related secret key. Take care managing the keytab file and make sure to store it securely. In this example, ktpass sets the user’s password is set to a random value, as shown in the following figure. You may also set your own password using ktpass if desired. Changing a user’s password increments the key version number (vno), invalidating previous keytabs. If you have multiple keytab files, then you can use the vno to determine which one is the latest. Make sure that you don’t reset the user’s password through other means, because you must generate a new keytab file for use with DataSync.
Create the keytab
- Open the Command Prompt on your Windows Server.
- Run the following command, substituting your principal, username, and output path for the keytab file.
ktpass /out <filepath> /princ <principal> /mapuser <username> rndpass /crypto AES256-SHA1 /ptype KRB5_NT_PRINCIPAL
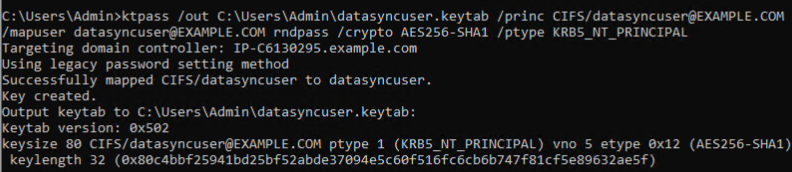
Figure 2: Output of ktpass when setting the SPN and creating the keytab file, showing the key version number (vno) 5
- To display the contents of the keytab file and check the version number, run the following command, substituting your path to the file, also shown in the following figure.
ktpass /in <filepath>

Figure 3: Output of ktpass with an existing keytab file, showing the related principal (for example CIFS/[email protected]) and the same key version (vno 5).
Step 2: Create your Kerberos configuration file
The Kerberos configuration file (krb5.conf) describes a mapping of domain names to realms and the DNS name to use when contacting the KDC(s) for that realm. For most Active Directory domains, the domain name in lower case matches the realm name in uppercase. This walkthrough provides a sample template here for a typical deployment. We specify kdc = example.com, which is the DNS record that resolves to all the registered domain controllers for this domain. You can also list individual KDCs if desired, adding each on a separate line starting with kdc = and the domain name of the server. If your directory involves subdomains or trusts, then you list those names and authoritative KDCs for them here as well.
Create a krb5.conf file
- Create a text file named krb5.conf.
- Using the following template, replace the example with your domain/REALM name, making sure to match the lower or upper case of each.
Step 3: Create the DataSync SMB location
You are now ready to create a DataSync SMB location with Kerberos authentication, shown in the following figure.
Begin creating your SMB location
- Log in to the DataSync console.
- From the sidebar choose Locations.
- Choose the Create location
- For Location type, choose Server Message Block (SMB).
- Choose your Agent (configured in the prerequisites).
- Enter the domain name of your SMB server. Kerberos needs the domain name instead of an IP address in this field.
- For Share name, enter your share name.

Figure 4: The DataSync console showing the Create location dialogue with sample inputs.
Step 4: Configure Kerberos authentication for your DataSync SMB location
For authentication you use the principal name, keytab file, and krb5.conf that you created in Steps 1 and 2, shown in the following figure. For more information, refer to DataSync configuration options for Kerberos.
Enter your configuration in the Authentication pane
- For Authentication type choose Kerberos.
- For Kerberos Principal enter the SPN that you specified when creating the keytab in Step 1. The principal is case sensitive, so make sure that it matches the exact name and case.
- For Keytab file choose the keytab file that you exported with the ktpass command.
- For DNS IP addresses – optional enter the addresses for your DNS servers. If the default DNS servers used by your DataSync agent can resolve the domain controllers and file share domain names, then skip this step.
- Choose Create location.
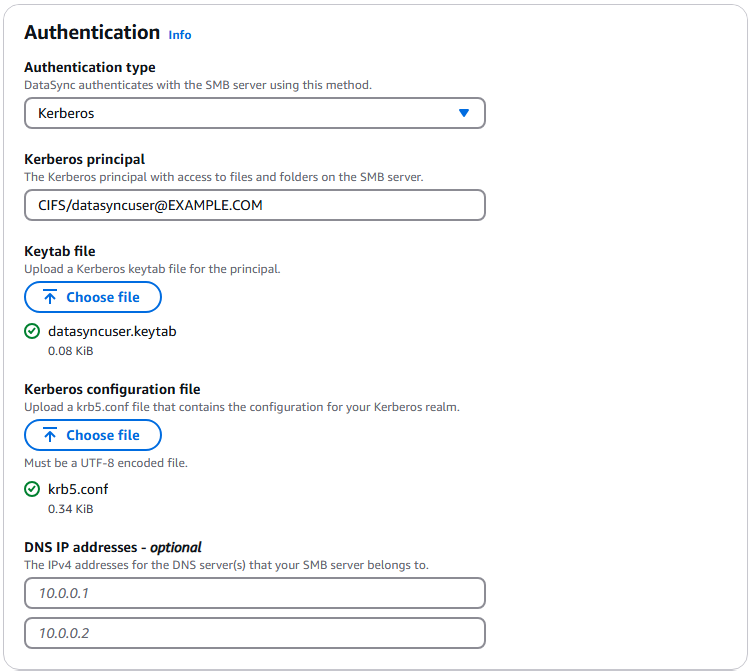
Figure 5: The Authentication section of DataSync SMB location configuration, showing the Kerberos properties entered
The console shows your new SMB location configured to use Kerberos. The SMB location is now ready to use with DataSync tasks, as shown in the following figure.
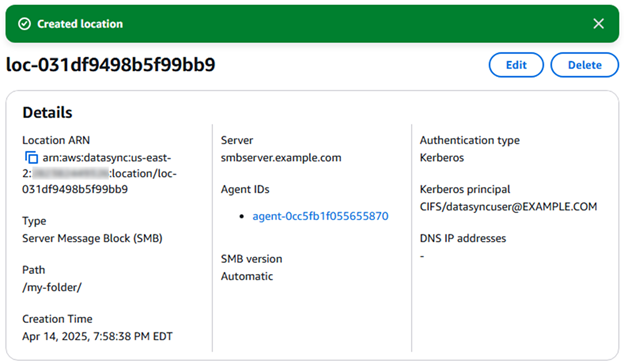
Figure 6: The location details displaying your completed Kerberos configuration.
Step 5: Create a DataSync task
Now that you have created the SMB location configured with Kerberos authentication, configure a DataSync task, and refer to the task settings documentation to learn more about the task settings and options.
When the task is created successfully, start your DataSync task by choosing Start from the task list, or inside the task overview itself. Learn more about task execution and monitoring your DataSync task with Amazon CloudWatch in the linked documentation.
Cleaning up
To avoid incurring future costs, remove the AWS resources that you created for this walkthrough.
- DataSync agent
- DataSync SMB location
- DataSync task
Furthermore, as part of maintaining Security in the Cloud and the Shared Responsibility Model, remember to secure or remove any copies the keytab file that you created.